Background
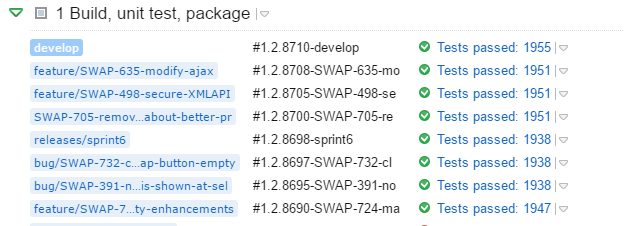
This is what we want to achieve, build numbers with minor, major and build counter parts together with the branch name.
What is a good version number? That depends on who you ask I suppose, but one of the most popular versioning schemes is semantic versioning. A version number following that scheme can look like the following:
1.2.34-beta
In this post I will show how an implementation for generating this type of version numbers in Teamcity with the following key aspects:
- The major and minor version numbers (“1” and “2” in the example above) will be coming for the AssemblyInfo.cs file.
- It is important that these numbers come from files in the VCS repository (I’m using Git) where the source code is stored so that different VCS branches can have different version numbers.
- The third group (“34”) is the build counter in Teamcity and is used to separate different builds with the same major and minor versions from each other.
- The last part is the pre-release version tag and we use the branch name from the Git repository for this.
- We will apply some filtering and formatting for our final version since the branch name may contain unsuitable characters.
In the implementation I’m using a Teamcity feature called File Content Replacer which was introduced in Teamcity 9.1. Before this we we had to use another feature called Assembly Info Patcher but that method had several disadvantages, mainly that there was no easy way of using the generated version number in other build steps.
In the solution described below, we will replace the default Teamcity build number (which is equal to the build counter) with a custom one following the version outlined above. This makes it possible to reuse the version number everywhere, e.g. in file names, Octopus Release names, etc. This is a great advantage since it helps make connect everything produced in a build chain together (assemblies, deployments, build monitors, etc).
Solution outline
The steps involved to achieve this are the following:
- Assert that the VCS root used is properly configured
- Use the File Content Replacer to update AssemblyInfo.cs
- Use a custom build step with a Powershell script to extract the generated version number from AssemblyInfo.cs, format it if needed, and then tell Teamcity to use this as the build number rather than the default one
- After the build is complete, we use the VCS Labeling build feature to add a build number tag into the VCS
VCS root
The first step is to make sure we get proper branch names when we use the Teamcity %teamcity.build.branch% variable. This will contain the branch name from the version control system (Git in our case) but there is a special detail worth mentioning, namely that the branch specification’s wildcard part should be surrounded with parentheses:
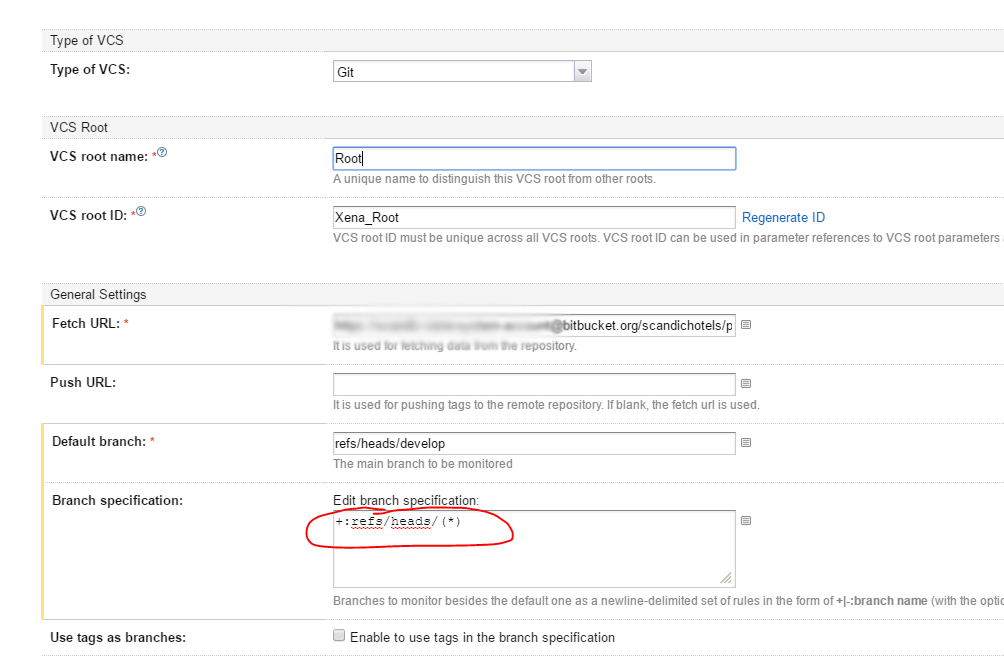
VCS root branch specification with parenthesis.
If we don’t do this, then the default branch (“develop” in this example) will be shown as <default> which is not what we want. The default branch should be the name branch name just like every other branch, and adding the parentheses ensures that.
Updating AssemblyInfo.cs using the File Content Replacer build feature
In order for the generated assembly to have the correct version number we update the AssemblyInfo.cs before building it. We want to update the following two lines:
[assembly: AssemblyVersion("1.2.0.0")]
[assembly: AssemblyFileVersion("1.2.0.0")]
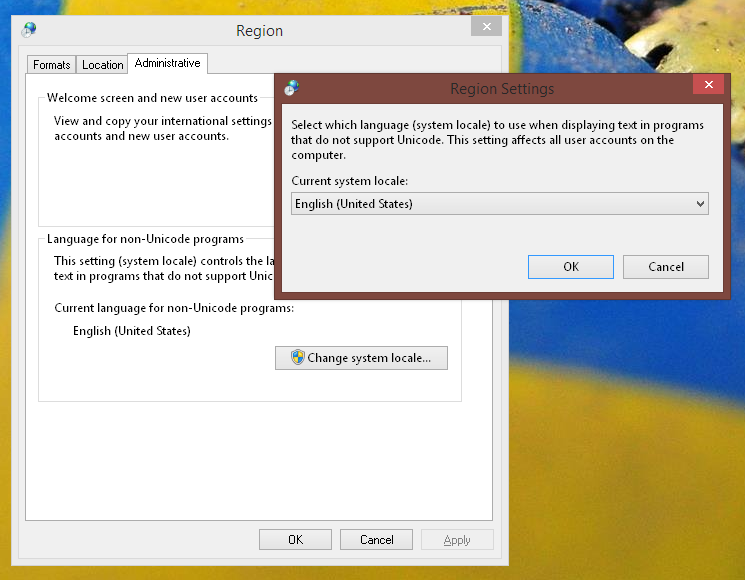
The AssemblyVersion attribute is used to generate the File version property of the file and the AssemblyFileVersion attribute is used for the Product version.
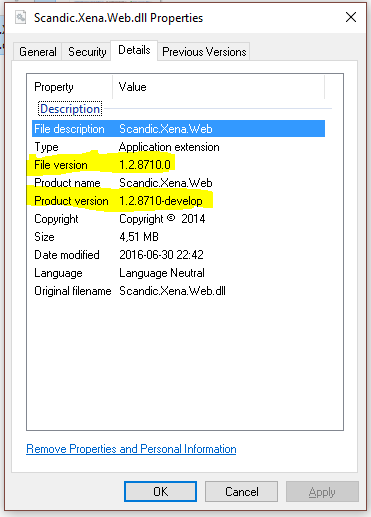
File version and product version of the assembly.
We keep the first two integers to use them as major and minor versions in the version number. Note that the AssemblyVersion attribute has restriction on it so that it must be four integers separated by dots, while AssemblyFileVersion does not have this restriction and can contain our branch name as well.
To accomplish the update, we use the File Content Replacer build feature in Teamcity two times (one for each attribute) with the following settings:
AssemblyVersion
- Find what:
(^\s*\[\s*assembly\s*:\s*((System\s*\.)?\s*Reflection\s*\.)?\s*AssemblyVersion(Attribute)?\(")([0-9\*]+\.[0-9\*]+\.)([0-9\*]+\.[0-9\*]+)("\)\])$ - Replace with:
$1$5\%build.counter%$7
AssemblyFileVersion
- Find what:
(^\s*\[\s*assembly\s*:\s*((System\s*\.)?\s*Reflection\s*\.)?\s*AssemblyFileVersion(Attribute)?\(")([0-9\*]+\.[0-9\*]+\.)([0-9\*]+\.[0-9\*]+)("\)\])$ - Replace with:
$1$5\%build.counter%-%teamcity.build.branch%$7
As you can see, the “Find what” parts are regular expressions that finds the part of AssemblyInfo.cs that we want to update and “Replace with” are replacement expressions in which we can reference the matching groups of the regex and also use Teamcity variables. The latter is used to insert the Teamcity build counter and the branch name.
In our case we keep the first two numbers but if the patch number (the third integer) should also be included, then these two expressions can be adjusted to accomodate for this.
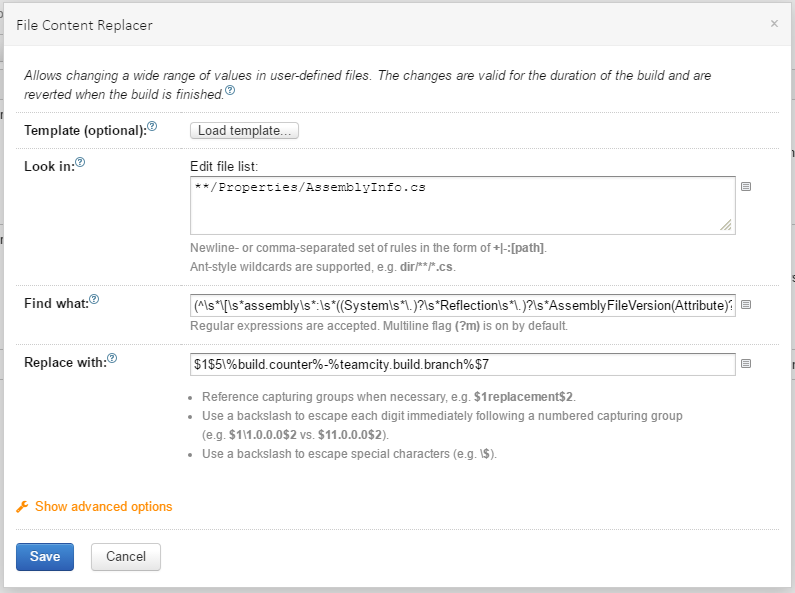
The FIle Content Replacer build feature in Teamcity.
When we have done the above, the build will produce an assembly with proper version numbers, similarly to what we could accomplish with the old Assembly Info Patcher, but the difference with the old method is that we now have an patched AssemblyInfo.cs file whereas with the old method it was unchanged as only the generated assembly DLL file was patched. This allows us to extract the generated version number in the next step.
Setting the Teamcity build number
Up to now, the Teamcity build number has been unchanged from the default of being equal to the build counter (a single integer, increased after every build). The format of the build number is set in the General Settings tab of the build configuration.
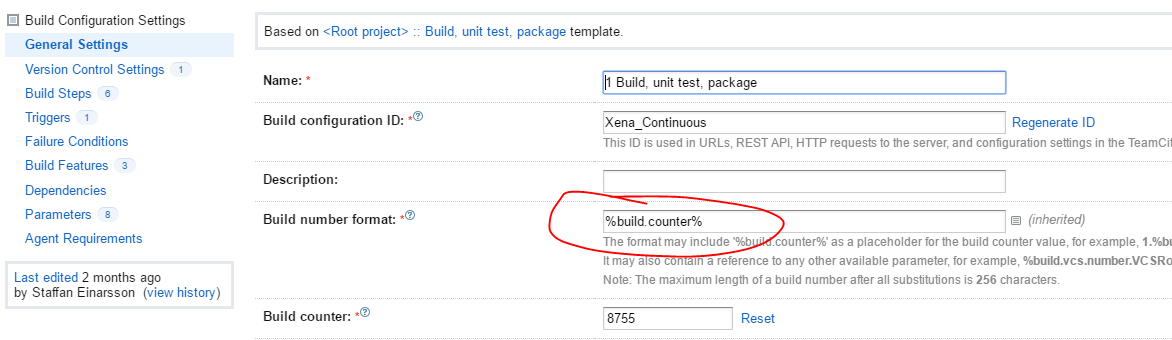
The General Settings tab for a build configuration.
The build number is just a string uniquely identifying a build and it’s displayed in the Teamcity build pages and everywhere else where builds are displayed, so it would be useful to include our full version number in it. Doing that also makes it easy to use the version number in other build steps and configurations since the build number is always accessible with the Teamcity variable %system.build.number%.
To update the Teamcity build number, we rely on a Teamcity service message for setting the build number. The only thing we have to do is to make sure that our build process outputs a string like the following to the standard output stream:
##teamcity[buildNumber '1.2.34-beta']
When Teamcity sees this string, it will update the build number with the supplied new value.
To output this string, we’re using a separate Powershell script build step that extracts the version string from the AssemblyInfo.cs file and does some filtering and truncates it. The latter is not strictly necessary but in our case we want the build number to be usable as the name of a release in Octopus Deploy so we format it to be correct in that regard, and truncate it if it grows beyond 20 characters in length.
Build step for setting the Teamcity build number
The actual script looks like this (%MainAssemblyInfoFilePath% is a variable pointing to the relative location of the AssemblyInfo.cs file):
function TruncateString([string] $s, [int] $maxLength)
{
return $s.substring(0, [System.Math]::Min($maxLength, $s.Length))
}
# Fetch AssemblyFileVersion from AssemblyInfo.cs for use as the base for the build number. Example of what
# we can expect: "1.1.82.88-releases/v1.1"
# We need to filter out some invalid characters and possibly truncate the result and then we're good to go.
$info = (Get-Content %MainAssemblyInfoFilePath%)
Write-Host $info
$matches = ([regex]'AssemblyFileVersion\(\"([^\"]+)\"\)').Matches($info)
$newBuildNumber = $matches[0].Groups[1].Value
# Split in two parts: "1.1.82.88" and "releases/v1.1"
$newBuildNumber -match '^([^-]*)-(.*)$'
$baseNumber = $Matches[1]
$branch = $Matches[2]
# Remove "parent" folders from branch name.
# Example "1.0.119-bug/XENA-5834" =&amp;amp;gt; "1.0.119-XENA-5834"
$branch = ($branch -replace '^([^/]+/)*(.+)$','$2' )
# Filter out illegal characters, replace with '-'
$branch = ($branch -replace '[/\\ _\.]','-')
$newBuildNumber = "$baseNumber-$branch"
# Limit build number to 20 characters to make it work with Octopack
$newBuildNumber = (TruncateString $newBuildNumber 20)
Write-Host "##teamcity[buildNumber '$newBuildNumber']"
(The script is based on a script in a blog post by the Octopus team.)
When starting a new build with this build step in it, the build number will at first be the one set in the General Settings tab, but when Teamcity sees the output service message, it will be updated to our version number pattern. Pretty nifty.
Using the Teamcity build numbers
To wrap this post up, here’s an example of how to use the updated build number to create an Octopus release.
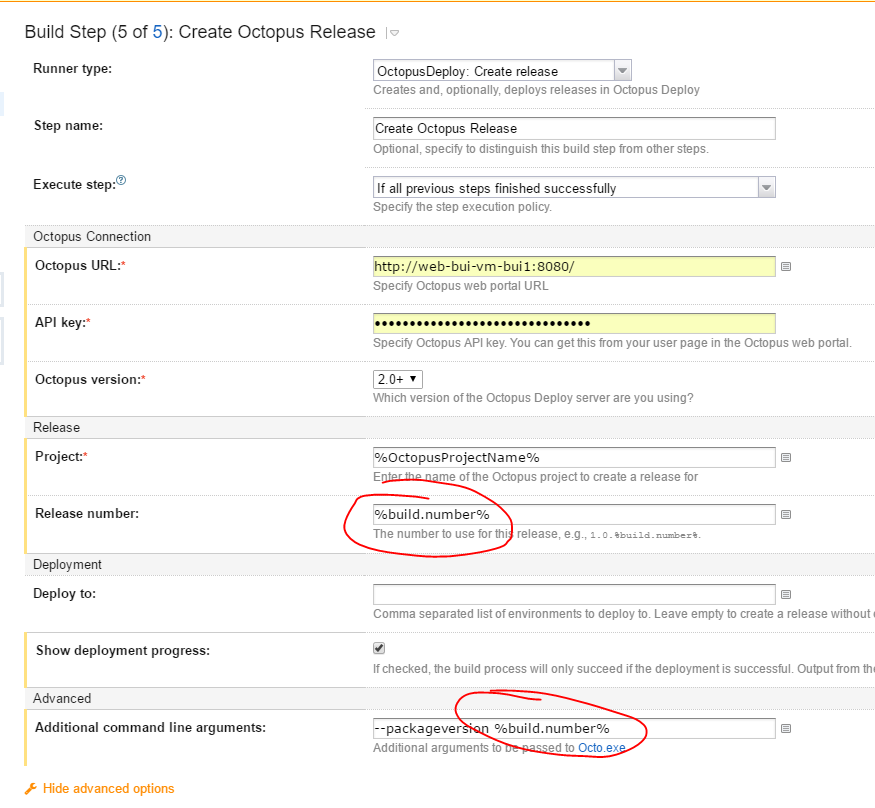
Creating an Octopus release with proper version number from within Teamcity.
In Octopus, the releases will now have the same names as the build numbers in Teamcity, making it easy to know what code is part of the different releases.
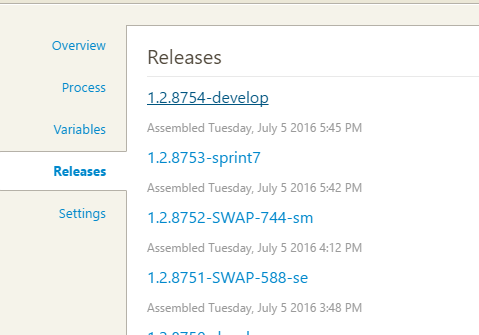
The releases show up in Octopus with the same names as the build number in Teamcity.
Tagging the VCS repository with the build number
The final step for adding full tracability to our build pipeline is to make sure that successful builds adds a tag to the last commit included in the build. This makes it easy in the VCS to know exactly what code is part of a given version, all the way out to deployed Octopus releases. This is very easy to accomplish using the Teamcity VCS labeling build feature. Just add it to the build configuration with values like in the image below, and tags will created automatically everytime a build succeeds.

The VCS Labeling build feature in Teamcity.
The tags show up in Git like this:
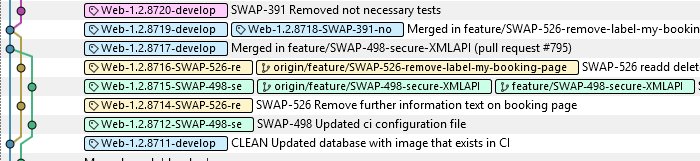
Tags in the Git repository connects the versions of successful builds with the commits included in the build.
Mission accomplished.
/Emil