
These days I tend to leave Visual Studio more and more often for doing simpler things that don’t require the full power of Visual Studio’s development tools like IntelliSense, the powerful debugging tools and ReSharper refactorings. My preferred text editor for the more light-weight work has become Visual Studio Code which, despite the name, does not have anything to do with Visual Studio. Except that it’s Microsoft that is behind it (their marketing department no doubt had some influence in the naming process). Just like in the Visual Studio case, I cannot help myself from meddling with the configuration options, so I though it might be a good idea to write down what I have done.
Color theme
Just like for Visual Studio, I’m using Solarized Dark and switching to that is easy since it’s built in into Code (File/Preferences/Color Theme).
What might be less well-known is that a new feature was recently added that allows for overriding the colors of the selected theme, namely the editor.tokenColorCustomizations setting. It works like this:
First investigate what TextMate scope it is you want to change color for. A TextMate scope is just an identifier which is normally associated with a regular expression that defines the character pattern for the scope. Since most language extensions in Visual Studio Code define scopes with the standardized identifiers for comments, strings, etc, all languages can be consistently colored by the color theme (a comment in C# looks the same as a comment in Javascript). By the way, TextMate is a text editor for Mac that first defined the syntax used for language support in Visual Studio Code (it’s also used in for example Sublime Text).To find the name of the token to change, do the following:
- Place the cursor on an item whose color should be changed (e.g. a comment)
- Open the command palette by pressing Ctrl + Shift + P and then type Developer: Inspect Editor Tokens and Scopes (was previously called “Developer: Inspect TM Scopes“).
- A window opens, showing information about the current scope:
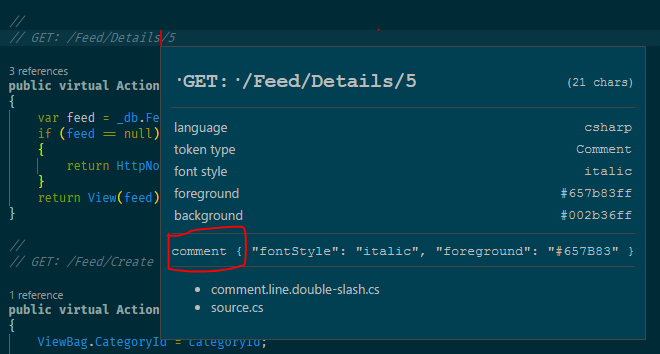 In this case it’s comment. Moving the cursor will update the scope information in the window. Close it with the Esc key.
 - To override the appearance of the identified scope, use the editor.tokenColorCustomizations setting:
"editor.tokenColorCustomizations": { "textMateRules": [ { "scope": "comment", "settings": { "foreground": "#af1f1f", "fontStyle": "bold" } } ] } - Saving the settings files makes it take effect immediately, without restarting the editor. In addition to foreground color, it is also possible to set the the font style to “bold”, “italic”, “underline” or a combination.
You can also override colors in the editor UI framework using the workbench.colorCustomizations setting but I won’t cover that here. Microsoft has some good documentation of what can be done.
Visual Studio Code Extensions
The above takes care of the basic color highlighting of files but I also use a few extensions for Visual Studio Code that I feel are worthy of mentioning in a post like this.
Bracket Pair Colorizer
Adds the rainbow parenthesis feature to Visual Studio Code (matching parentheses and brackets have the same color which is different from the colors used by nested parentheses). It works really well and has configurable colors.
More info here.
Color Highlight
![]()
Visualized web color constants in source code. Very useful for all sorts of work, not just web. It’s also enabled in user settings, for example, so you can get a preview of colors when modifying the currrent theme colors 😉
More info here.
Log File Highlighter
This extension is actually written by yours truly and is used for visualizing different items in log files, such as dates, strings, numbers, etc.

By default it associates with the .log file extension but it can be configured for other files types as well. It’s also easy to temporarily switch to the log file format by pressing Ctrl + K, M and the type Log File in the panel that opens.
More info here.
Nomo Dark Icon Theme
This extension adds really nice icons to the folder view in Visual Studio Code. It looks much better with this installed.
More info here.
Sort-lines
Sort lines is a little extension that has nothing to do with colors but I think it’s worth mentioning it anyway since I find it very useful from time to time. It adds several commands for sorting text, the one that is a bit unique is called Sort lines (unique). What it does is to sort the selected lines and remove all duplicates. very useful for aggregating data from data queries, log files etc.
More info here.
Roaming settings with symbolic links and DropBox
Once you get everything configured the way you want it, you have to repeat all the above steps on other computers you use Visual Studio Code on since it has no support for roaming user settings, which is a bit cumbersome. However, there’s an old trick that fixes that, namely to use symbolic directory link to a DropBox folder (or another similar file-sync service such as OneDrive) instead of the standard settings folder for Visual Studio Code.
To do this, follow these steps:
- Close Visual Studio Code if it’s open.
- Move the settings folder %APPDATA%\Code\User\ to somewhere in your DropBox (or OneDrive) directory tree.
- Create a symbolic directory link replacing the old folder with a link to its new location inside DropBox:
mklink /d %APPDATA%\Code\User\ "C:\Users\easw3p\Dropbox\Shared\VS Code\AppData_Code_User"

(adjust the DropBox path so it matches your setup).
- Start Visual Studio Code again to verify that everything works.
On all other machines that should use the same settings, just remove the default settings folder and create the symbolic link like shown above, and all settings should be synchronized across all machines. As a bonus, you have just enabled version controlled settings since it’s easy DropBox to show file histories and roll back changes in DropBox.
And with that I’ll end this post. Feel free to add suggestions or comment on the above 🙂
/Emil